The Position Worksheet highlights the exchange risk exposure, whether higher or smaller compared with the set up hedging and bank balance. It states:
- the hedging level in amount and in percentage,
- the average rate of the position and the hedging,
- the hedging distribution and details by transaction type.
You can view the Position Worksheet by company, currency and period.
You can also view the details of the amounts and analyze the modifications on the transactions in real time, which makes the position analysis and decision-making process easier.
The Position Worksheet indicates the hedging level (the commercial transactions balance minus the foreign exchange transactions balance), the average currency rate for the position, the hedging transactions and the hedging details by transaction type.
Two concepts are essential to the calculation of the global exchange position:
- the assessment of the commercial transaction and its hedging by a forward exchange transaction,
- it is the breakeven point rate, i.e. the rate at which the company should complete the foreign exchange transaction to get a closed position.
Info
When the breakeven point rate corresponds to the market rate, the position is called mark-to-market.
You can use different views for the Position Worksheet, which enables the optimization of your exchange position analysis:
- the filters setup enables you to define the selection criteria and various display settings,
- the cube setup enables you to reorganize the display of amounts by grouping or by describing them according to specific criteria.
- From the Modules Tasks pane, select the FX position worksheet option in the Report file of the FX module.
- If no filter has been set up for this report, the creation page for filters is displayed. You first need to create a filter.
This filter enables you to select the commercial transactions, the foreign exchange transactions as well as the currency borrowing and loan transactions to display according to your criteria.
View the topic below for more information on the creation of selection filters for transactions.
- If a filter has already been set up, the modification page for filters appears with the default filter settings.
If you need to modify the filter settings, see below the topic regarding filters creation.
- Click OK to view the report with the filter settings.
The FX Position Worksheet is displayed in a table.
The exchange position is:
- short (or under-hedged) if the net global is negative,
- closed if the net global is null,
- long (or over-hedged) if the net global is positive.
For more information on the various functions of the FX Position Worksheet and on the creation of filters for this worksheet, see the topics below.
If you want to view information from the Position Worksheet as a chart, you can export them to Microsoft Excel © and use its chart functions.
For more information on specific toolbars for FX Position Worksheet (actions and OLAP toolbars), see topic Actions Toolbar.
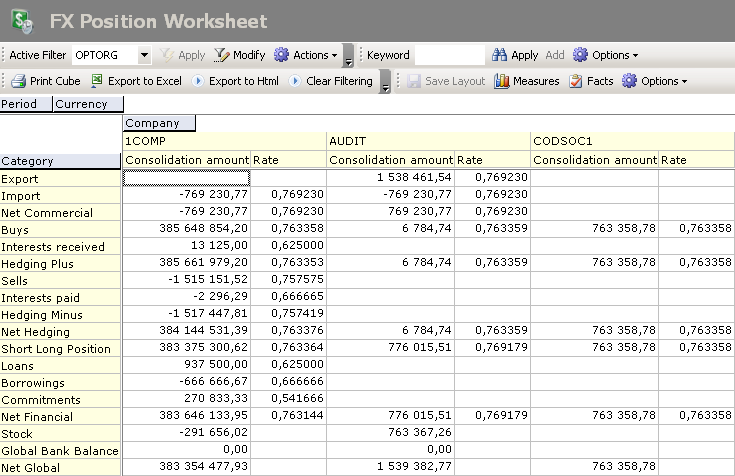
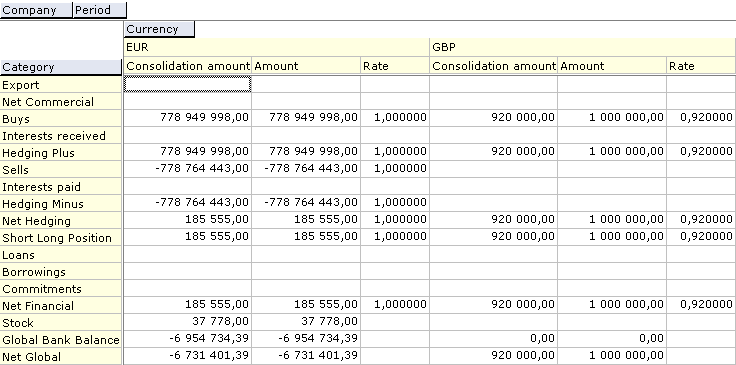
You can view the details of amounts or the totals of categories.
![]() Example of detailed view for the amounts
Example of detailed view for the amounts
![]() Example of global view for the amounts
Example of global view for the amounts

To switch from one display mode to the other, use the View tab in the display filter of the FX Position Worksheet, as described below.
- From the report page of the FX Position Worksheet, click the Modify button in the filters toolbar.
The modification page for filters is displayed.
- Click on the View tab.
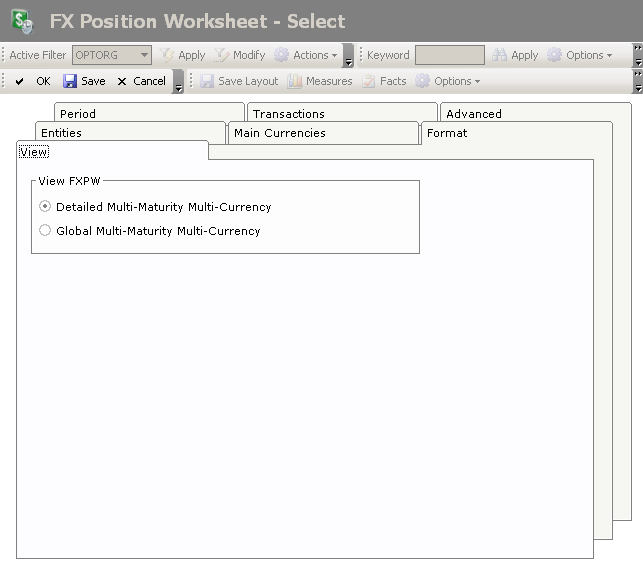
This tab enables the display setup for the FX Position Worksheet.
- Enable the following option:
- Detailed Multi-Maturity Multi-Currency if you want to view the details of the amounts by category,
- Global Multi-Maturity Multi-Currency if you want to view the total of the amounts.
- Click Save to apply the modification and save it in the filter, or click OK to apply it without saving it in the filter.
The report is displayed again. The modified settings are applied.
This function enables you to view the list of the commercial and foreign exchange transactions that are taken into account in the calculation of the global amount for a cell displayed in the Position Worksheet.
In the Position Worksheet, double-click an amount in the Consolidation Amount column to view its details.
A contextual menu appears.
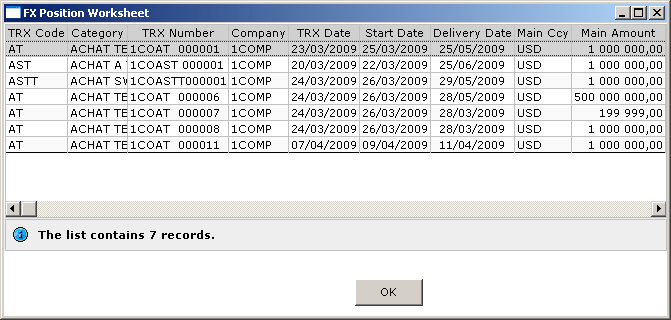
This window lists the foreign exchange transactions that are taken into account in the amount, as well as the associated commercial transactions with for each one, the type, the category and the transaction number, the company, the transaction date, the value and delivery dates, the main currency, the transaction amount in the main currency and the exchange rate.
Click OK to close the contextual window.
- To access the creation page for filters from the report page of the FX Position Worksheet, click the Actions dropdown menu in the filters toolbar, and select the Add option.
The creation page for filters is displayed.
This page enables the definition of unique identification information for the filter.
- Enter a code and a description for the filter in the Code and Description fields.
- If you want this filter to be applied by default when you access the report page, enable the Template Default Filter option.
- If you want this filter to be only accessible by yourself, select the Private option.
- You may add a comment in the Text area.
- Click the Configure button to set up the filter settings.
The configuration page for filter settings is displayed.
If you want to copy the settings of an existing filter, click the Copy From button in the action bar. Click here for more information.
Info
If you do not specify any filtering criterion for the transactions in the different tabs of this page, the report will include all the existing FX transactions.
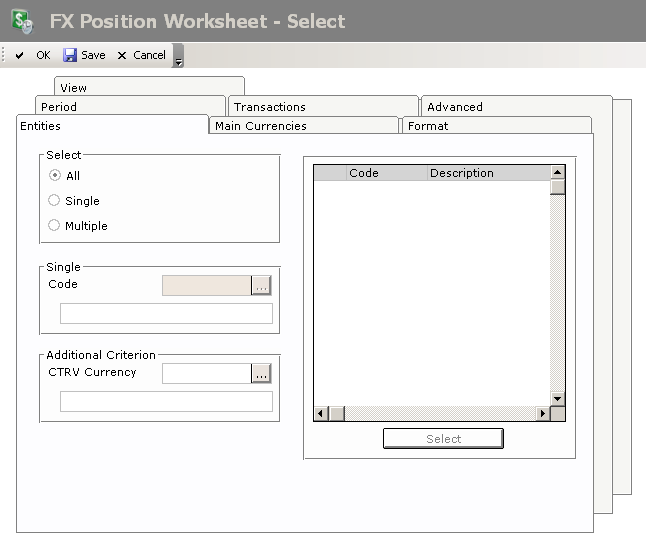
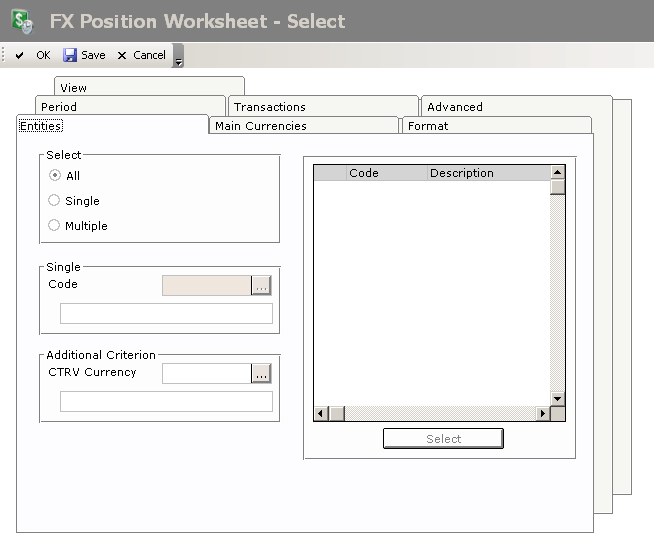
The Entities tab enables you to filter the countervalue currency, and the companies for which you want to view the FX Position Worksheet.
- In the Select area, enable the following option:
- All not to apply any filter on the companies,
- Single to select a single company (selection in the area below),
- Multiple to select several companies (selection in the area on the right).
- In the Select area , if you selected the following option:
- Single, select a company by clicking the
 button in the Single area, then, in the contextual window, double-click your company;
 - Multiple, select several companies as described below.
- On the right of the Select area, click the Select button.
- In the contextual window, enable the options in front of the codes for the companies to select, and click the
 button at the top of the window.
The codes and descriptions for the selected companies are displayed in the table of the area.
- In the Additional Criteria area, you can add another filtering criterion on the countervalue currency of the transactions, using the button as described below.
- Click on the Main Currencies tab.
This tab enables you to specify the filtering criteria on the main currencies. To set up the filtering on main currencies, go through the same process as for the filtering on companies in the previous tab.
- Click the Format tab.
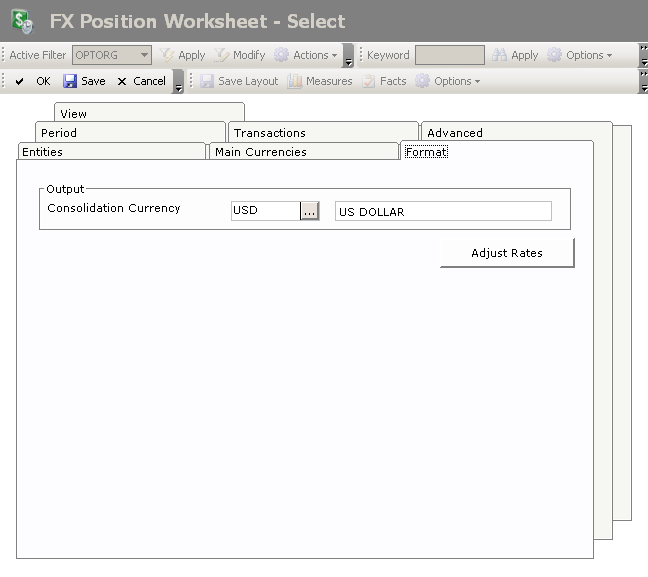
This tab enables you to specify the filtering on the consolidation currency of the Position Worksheet, as well as to modify the values of market exchange rates for foreign currencies, according to the selected consolidation currency.
The selected consolidation currency determines the currency into which the amounts of the companies positions are converted. If no consolidation currency has been entered in this tab, there is no conversion and the amounts of the companies' positions are displayed in the transactions' currencies.
The default consolidation currency is:
- the currency of the company if you selected only one company in the Entities tab,
- the reference currency if you selected several companies in the Entities tab.
- In the Consolidation Currency field, click the button , then, in the contextual window, double-click a line to select the corresponding currency.
The code and description of the selected currency are displayed in this field.
- Go through the following process if you want to modify the values of exchange rates for main currencies (selected in the Main Currencies tab) according to the selected consolidation currency.
- Click the Adjust Rates button.
The adjusting page for exchange rates is displayed.
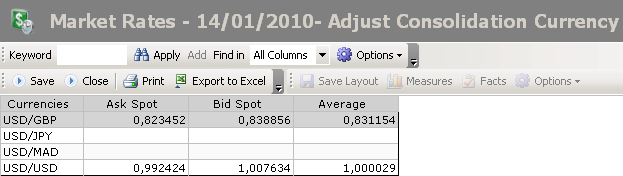
This page contains the following data concerning the currency pairs (consolidation currency/transaction main currency) set up in the Setup module:
- the value of the spot buying exchange rate at the current date, in the Ask Spot column,
- the value of the spot selling exchange rate at the current date, in the Bid Spot column,
- the average of the buying and selling spot exchange rates, in the Average column.
Important
Entering or modifying the values of the market exchange rate will have an impact on all the Sage XRT Treasury modules that use the market exchange rate. You can access the full management of currencies' rates in the Market Data module. For more information on this function, see the documentation of this module.
- Double-click a cell in the Ask Spot or Bid Spot columns, to enter or modify the value of the corresponding buying or selling exchange rate, and press the Enter key to validate the entry.
Important
If you enter the value of the spot buying or selling exchange rate for a currency pair, you also need to enter the complementary value (bid/ask rates).
Do not complete the Average column. This value is automatically calculated on the basis of the values for the buying and selling exchange rates, once you clicked the Save button of the page.
- Click Save to save your entries on this page, or Close to cancel them.
The Format tab of the creation page for FX Position Worksheet filters is redisplayed.
- Click the Period tab.
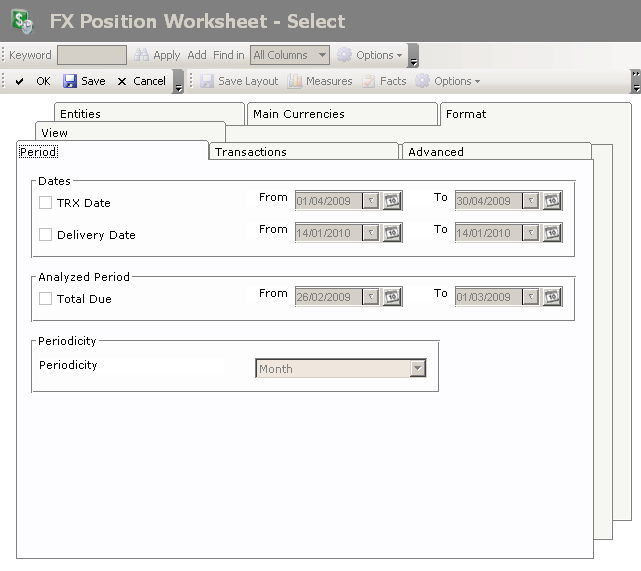
This tab enables you to specify filtering criteria on the frequency and the analyzed period, as well as on the transaction and delivery dates for the transactions to include in the report.
- To define a filtering process on the transaction date:
- Enable the TRX Date option.
The fields next to the option are enabled.
- In these fields, specify the start and end date of the period, between which must fall the transaction date of the transactions to include in the report, by going through the following process:
- In the entry field, select the value to modify and enter a date with the format dd.mm.yyyy.
- or -
- Click the
 button to display the calendar.
A contextual window displays the calendar.
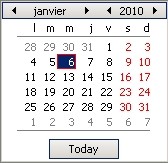
Use the arrows  and
and  to select the month, year and day.
- or -
To set the start date to today's date, click the button Today.
- To specify a filtering process on the delivery date, enable the Delivery Date option, then go through the same process as above, to define the start and end dates of the period, between which must fall the delivery date for the transactions to include in the report.
- To specify a filtering process on the analyzed date, select the Total Due option in the Analyzed Period area, then go through the same process as above, to define the start and end dates of the analyzed period.
Important
The maximum length for the analyzed period is 24 months.
- If you enabled the filtering process on the analyzed date, in the Time step dropdown list, select the time step of the analyzed period: it can be a day, a week, a decade, a fortnight, a month or a quarter.
- Click the Transactions tab.
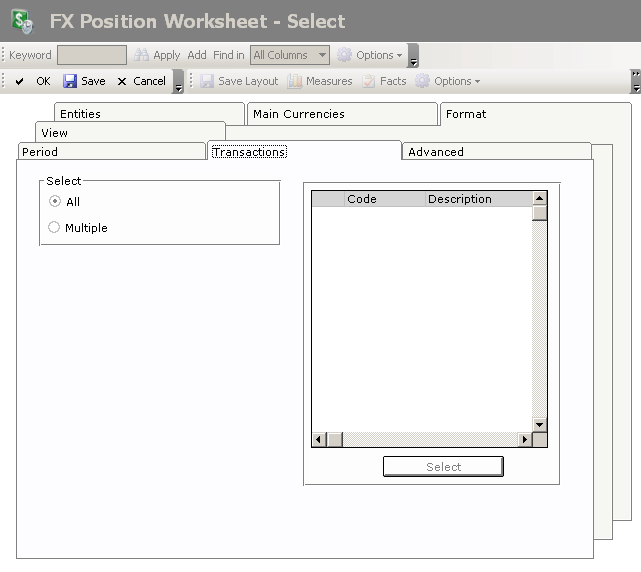
This tab enables you to specify filtering criteria on the types of FX transactions, commercial transactions and currency borrowing and loan transactions. To define the filtering criteria, go through the same process as in the previous tab concerning the filtering on companies.
- Click on the Advanced tab.
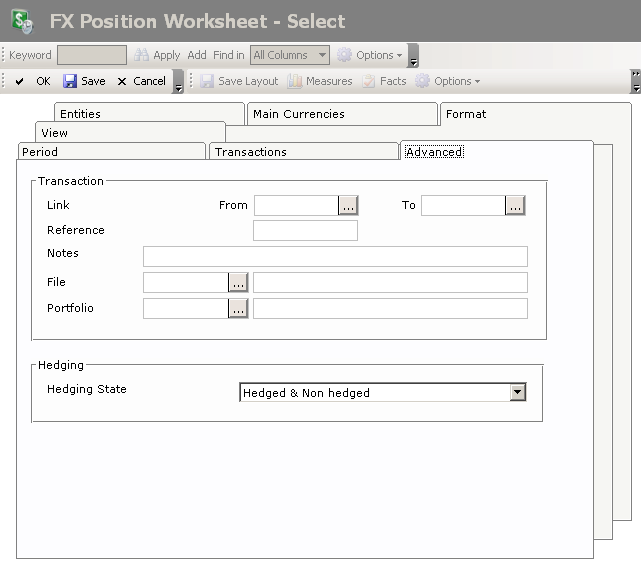
This tab enables you to specify filtering criteria on the order numbers, the external reference and the link numbers of the transactions to include in the FX Position Worksheet.
- In the Link field, enter a range of link numbers for the FX and commercial transactions, or select a range using the button as explained previously.
- In the Reference field, enter the external reference number for FX and Commercial Transactions.
- In the Notes field, enter the begining of the notes for the transactions.
- In the File field, enter the file number of the transactions, or select the file using the button .
- In the Portfolio field, enter the portfolio number of transactions, or select the portfolio using the button.
- In the Hedging Status dropdown list of the Hedging area, select the option:
- Hedged to include only the commercial transactions that are updated and linked to FX transactions, whatever the period defined for the transaction delivery dates in the Period tab,
- Non-hedged to include only the commercial transactions that are updated but not linked to FX transactions,
- Hedged & Non-Hedged to disable the filtering process on the transactions hedging.
- Click on the View tab.
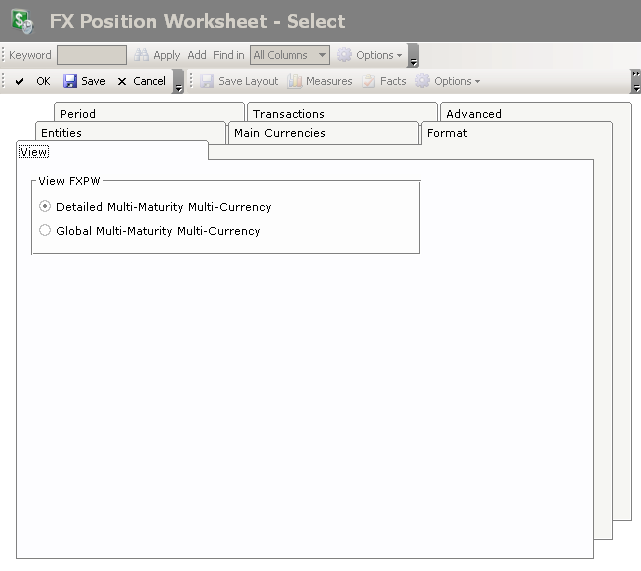
This tab enables the display setup for the FX Position Worksheet.
- Enable the following option:
- Detailed Multi-Maturity Multi-Currency if you want to view the details of the amounts by category,
- Global Multi-Maturity Multi-Currency if you want to view the total of the amounts.
![]() Example of detailed view for the amounts
Example of detailed view for the amounts
![]() Example of global view for the amounts
Example of global view for the amounts
- Click OK to confirm the filter creation and view the report with the new filter settings.